Introduction
While working on the title Animal Super Squad, I, like many before me, ran into the issue of variable timestep in Unreal’s physics-implementation. In this game all vehicles are driven using custom spring and wheel logic, with Unreal’s PhysX implementation used as foundation for forces, and collision detection. This game was released for a multitude of platforms including PC, PS4, Xbox One, Nintendo Switch, Android, and IOS. As you might expect, some of these platforms can have difficulties maintaining constant framerates.
While researching a fix for our inconsistent physics problem, I got very frustrated with the lack of useful information. There were some good sources, such as Giuseppe Portelli’s Everything you always wanted to know about Unreal Engine physics. However just like this one, many have one, or more, fatal flaws that I will discuss more in-depth in the coming chapters.
Since the release of Animal Super Squad, we have been working on a few different physics-based games such as the very physics-heavy title Just Die already, and Two Cars Adopt a Baby.
Working on these physics-heave titles in Unreal has taught me one or two things about how to properly do physics in this engine, and I hope to share some of it with you.
All you need to know, and then some
You just finished your awesome spring formula in Unreal. It’s working great and you proudly show it off to all in the office. Even though they mostly don’t understand what you’ve done, they seem slightly impressed.
All is well, until a few days later, a designer points out that your spring explodes in low framerates. This is when you learn that Unreal, unlike some game engines, does not have a fixed timestep solution for their physics implementation.
Like most people you have probably googled around thinking that there must be a solution to this, and yes there is! It’s called substepping.
What is Substepping
To properly explain substepping, lets imagine a traditionally difficult entity to implement: a fast-moving projectile.
If you’ve ever implemented a fast-moving projectile in a game, you will know that collision detection can be a pain. It is in general very difficult to detect whether an object has just passed through a wall, as illustrated in the first image to the right.
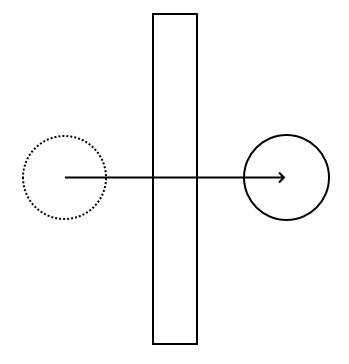
There are a few different solutions to this problem, the easiest being not to have a projectile moving fast enough to be able to pass through walls. To explain further: an object should, during one frame, never move a larger distance than its diameter.
So, you take this into account when designing your game, making sure to keep the speed of all your objects within reasonable limits. But then you hit the issue of framerate. You see, a perfectly reasonable speed at 60 fps might be too much at 30, or lower framerates. Any experienced game developer will understand the reason for this, to keep the game running at the same speed at lower framerates, the object needs to move further each frame.
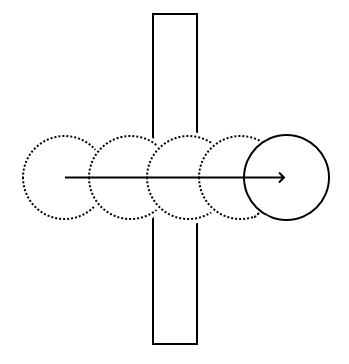
Enter substepping. Let’s say that we have designed our game to work well at 60 fps, what we can do is to enforce the collision system to operate at a “minimum” of 60 ticks (or physics steps) per second, as illustrated in the second image to the right.
How it works in Unreal
The concept of substepping is often built into most physics-engines, and unreal is no different. To enable substepping in unreal, you only need to enable it in the Project Settings > Physics > Framerate
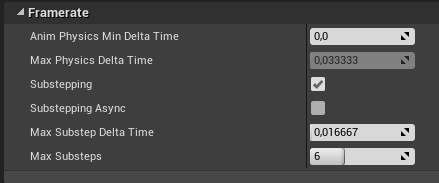
Just check the Substepping box (you can ignore the Async options as it is no longer used as of 4.22).
Congratulations! Your physics will now be semi-stable at all framerates. Well, kinda…
You see, this only works for “out of the box” physics simulations, such as object collision, or constant forces. If you were to, for example, implement a physics spring, it would still behave incorrectly as you are still only calculating the spring forces ever game tick, not during the physics tick. Well how do you do this then??
Let me show you how!
Let’s create a small example!
Since we were talking about projectiles, let’s make our very own projectile using substepping in unreal.
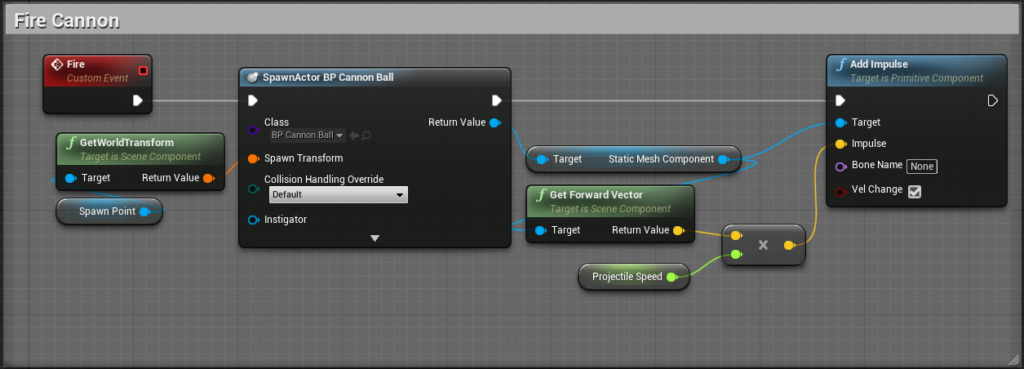
Using blueprint, we can setup a simple cannon which fires spherical cannonballs towards a target. The cannonball is a simple StaticMeshActor with its mesh set to the default engine sphere. SimulatePhysics has then been set to true in the inspector.

We can then create a simple cannon actor using the following script:
At 60 fps, with projectile speed set to 6000 cm/s we get the following result.

Looks pretty good! And it was so simple to set up. So, what happens when we lower the framerate? Using the console command t.maxFPS 30 we fire the cannon again.

Oh, that’s not good. But that’s what substepping is for! Let’s try again with substepping enabled in the Project Settings.
So, running with t.maxFPS 30 again, but with substepping enabled.
Wow! That looks pretty much identical to the 60 fps version!
So, this is great and all, but the example was supposed to be about how to run your physics calculation during the physics tick, and not the game tick. Very well, let’s create a more advanced example that requires some custom physics calculations.
Simulating an Arrow
Let’s replace that boring sphere mesh with something more fun, how about an arrow!

With this new mesh, let’s try and fire it through the air.
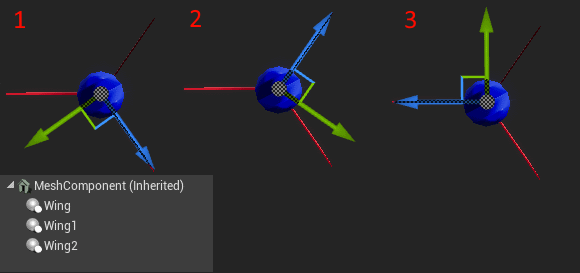
Hmm, doesn’t quite look like we would expect an arrow to behave, does it? Well that’s because, in real arrows, the fins at the back has some drag depending on how they’re traveling through the air. Think of it as three small wings at the back, causing the arrow to stabilize its orientation in the direction of travel.
Let’s model this behavior using C++. Since there are three fins, let’s make this into a component such that we can re-use the “wing” behavior for each fin.
For this example, I will create two versions, one with substepping, and one without. Let’s begin without substepping.
WingComponent.h
#pragma once

#include "CoreMinimal.h"
#include "Components/SceneComponent.h"
#include "WingComponent.generated.h"

UCLASS( ClassGroup=(Custom), meta=(BlueprintSpawnableComponent) )
class SUBSTEPEXAMPLE_API UWingComponent : public USceneComponent
{
	GENERATED_BODY()
public:
	UPROPERTY(EditAnywhere, BlueprintReadWrite, Category = "Wing")
	float LiftConstant = 100.f;

public:
	UWingComponent();

	virtual void TickComponent(float DeltaTime, ELevelTick TickType, FActorComponentTickFunction* ThisTickFunction) override;
};
WingComponent.cpp
#include "WingComponent.h"
#include "Components/PrimitiveComponent.h"
#include "Components/SkeletalMeshComponent.h"

UWingComponent::UWingComponent()
{
	PrimaryComponentTick.bCanEverTick = true;
}


void UWingComponent::TickComponent(float DeltaTime, ELevelTick TickType, FActorComponentTickFunction* ThisTickFunction)
{
	Super::TickComponent(DeltaTime, TickType, ThisTickFunction);

	if (UPrimitiveComponent* PrimitiveParent = Cast<UPrimitiveComponent>(GetAttachParent()))
	{
		const auto SocketName = GetAttachSocketName();
		if (!PrimitiveParent->IsSimulatingPhysics(SocketName))
			return;

		const auto WingWorldTransform = GetComponentTransform();
		const auto WingLocation = WingWorldTransform.GetLocation();
		const auto WingUpVector = WingWorldTransform.GetRotation().GetUpVector();

		const auto VelocityAtWing = PrimitiveParent->GetPhysicsLinearVelocityAtPoint(WingLocation, SocketName);
		const auto LiftForceMagnitude = FVector::DotProduct(VelocityAtWing, WingUpVector);
		const auto LiftForce = WingUpVector * LiftForceMagnitude * LiftConstant * -1;

		PrimitiveParent->AddForceAtLocation(LiftForce, WingLocation, SocketName);
	}
}
I’m not going to go too much into how the physics here work, as that’s not the focus of this example. Just know that this is a basic drag formula, that takes into account the up vector of the wing component in relation to the component’s velocity.
Let’s add this component to our arrow projectile. Since our arrow has three fins, I will add three wings, however it would probably work fine with two, or even just one. I’ve added all the wing components onto the arrow blueprint, at the back of the arrow, with each wing having their up vector pointing in the direction of their respective fin.
Ok, let’s take a look!

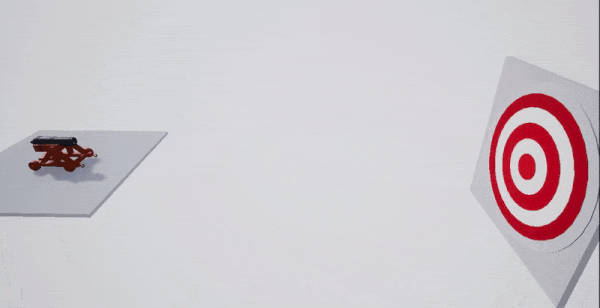
Looks good! In this example substepping won’t give us much, as the discrepancy between different framerates would be so small. Let’s build an example where we would like to hit target that’s very far away, with high accuracy, and consistency. After moving the target a few hundred meters away and adjusting the power of the ballista we get the following result.

That’s better, so how does it perform with lower framerates?

Well, not to bad actually. We can however clearly see that the arrow hit a different point on the board. So why is this? Remember the whole thing about applying our physics in the physics tick rather than in the game tick? Well, we are currently running our physics code in TickComponent which runs within the game tick, which means that any “extra” physics updates that happens due to low framerate won’t have our wing forces applied to them. To fix this, let’s add some substepped custom physics!
Doing this in unreal requires you to re-think your setup a bit. We will no longer be working with the UPrimitiveComponent, but instead with the FBodyInstance. Think of the body instance as the primitive’s representation in the physics scene.
Let’s make the following modifications:
WingComponent.h
#pragma once

#include "CoreMinimal.h"
#include "Components/SceneComponent.h"
#include "PhysicsEngine/BodyInstance.h" // Add this include
#include "WingComponent.generated.h"

UCLASS( ClassGroup=(Custom), meta=(BlueprintSpawnableComponent) )
class SUBSTEPEXAMPLE_API UWingComponent : public USceneComponent
{
	GENERATED_BODY()
private:
    // The delegate used to register substepped physics
	FCalculateCustomPhysics CalculateCustomPhysics;

public:
	UPROPERTY(EditAnywhere, BlueprintReadWrite, Category = "Wing")
	float LiftConstant = 100.f;

public:
	UWingComponent();

	virtual void BeginPlay() override;
	virtual void TickComponent(float DeltaTime, ELevelTick TickType, FActorComponentTickFunction* ThisTickFunction) override;

    // The function used to apply substepped physics
	virtual void SubstepTick(float DeltaTime, FBodyInstance* BodyInstance);
};
WingComponent.cpp
#include "WingComponent.h"
#include "Components/PrimitiveComponent.h"
#include "Components/SkeletalMeshComponent.h"

UWingComponent::UWingComponent()
{
	PrimaryComponentTick.bCanEverTick = true;
}

void UWingComponent::BeginPlay()
{
	Super::BeginPlay();
	CalculateCustomPhysics.BindUObject(this, &UWingComponent::SubstepTick);
}

void UWingComponent::TickComponent(float DeltaTime, ELevelTick TickType, FActorComponentTickFunction* ThisTickFunction)
{
	Super::TickComponent(DeltaTime, TickType, ThisTickFunction);

    // We need to sign up for custom physics each frame, which is why this is called in TickComponent

	// It is only possible to add custom physics to a simulating primitive component.
	// The reason for GetAttachSocketName(), is that we might be attached to a skeletal mesh socket,
	// in which case we would get a different BodyInstance than if we were attached to the root socket.
	if (UPrimitiveComponent* PrimitiveParent = Cast<UPrimitiveComponent>(GetAttachParent())) {
		if (PrimitiveParent->IsSimulatingPhysics(GetAttachSocketName())) {
			if (FBodyInstance* bodyInstance = PrimitiveParent->GetBodyInstance(GetAttachSocketName())) {
				bodyInstance->AddCustomPhysics(CalculateCustomPhysics);
			}
		}
	}
}

void UWingComponent::SubstepTick(float DeltaTime, FBodyInstance* BodyInstance)
{
	// This function now gets called during the physics tick.
	// If any "additional" physics frames get inserted,
	// this function will get called multiple times
	const auto ParentWorldTransform = BodyInstance->GetUnrealWorldTransform();
	const auto WingWorldTransform = GetRelativeTransform() * BodyInstance->GetUnrealWorldTransform();
	const auto WingLocation = WingWorldTransform.GetLocation();
	const auto WingUpVector = WingWorldTransform.GetRotation().GetUpVector();

	const auto VelocityAtWing = PrimitiveParent->GetPhysicsLinearVelocityAtPoint(WingLocation, SocketName);
	const auto LiftForceMagnitude = FVector::DotProduct(VelocityAtWing, WingUpVector);
	const auto LiftForce = WingUpVector * LiftForceMagnitude * LiftConstant * -1;

	BodyInstance->AddForceAtPosition(LiftForce, WingLocation, false/* Needs to be false if called in a substepped function */);
}
So, there are a few things I’d like to address here, mainly the WingWorldTransform. The reason we can no longer use GetComponentTransform() is that this function reads the location from the game scene, not the physics scene. Since the physics result is copied over to the game scene after all substepps are finished, this location will be outdated if we were to have multiple substep ticks. We instead need to use the BodyInstance to fetch this data, as it reads it directly from the physics scene.
The same thing does not howerver hold true for GetPhysicsLinearVelocityAtPoint(). If you look at its implementation in PrimitiveComponentPhysics.cpp you will see that it already uses the BodyInstance to fetch this data, hence it will be correct.
The reason for GetRelativeTransform() * BodyInstance->GetUnrealWorldTransform() is that only primitive components with collision has a BodyInstance. We therefore have to use the world location of our parent and add back our relative transform.
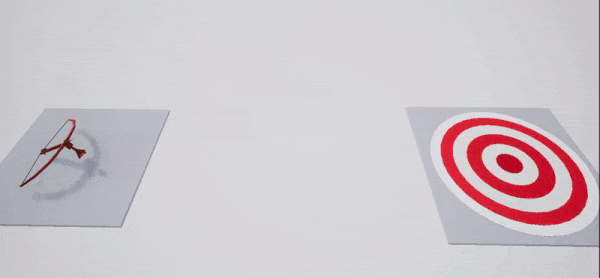
So, with all of this out of the way, how does it look with low framerates now?

Well, that’s basically the exact same location as our 60fps version!
If you made it this far, congratulations! You are now an expert in substepping, you should be able to use what you’ve learned here to create your very own stable physics models.
The example project can be downloaded here.
What almost everyone gets wrong
You get all your OnHit events at the end of all substeps
For performance reasons, epic has decided to accumulate all the hit events during substepping, and dispatch all of them once all substepping is finished. This means that you can get multiple hit events at once. This usually doesn’t make a big difference, but it is important to keep in mind.
Don’t write PhysX code
Many other tutorials/examples will bring up the whole “use the physics scene, and not the game scene”, however they opt to write PhysX code to achieve this. This is completely unnecessary, an even wrong!
You will often see code like this:
PxRigidBody* PRigidBody = BodyInstance->GetPxRigidBody();
PxTransform PTransform = PRigidBody->getGlobalPose();
PxVec3 PVelocity = PRigidBody->getLinearVelocity();
PxVec3 PAngVelocity = PRigidBody->getAngularVelocity();


PRigidBody->addForce(PForce, PxForceMode::eFORCE, true);
PRigidBody->addTorque(PTorque, PxForceMode::eFORCE, true)
Not only is this really difficult to read for anyone who doesn’t know PhysX, it also locks you into using PhysX, and you won’t be able to switch to say, Unreals new physics solver Chaos Physics.
Don’t call GetLocation on your game scene
We already touched on this, but I can’t tell you how many bugs we’ve had due to people not understanding this (me included). Whenever you see a GetLocation()/GetTransform()/GetRotation() in a substepped function, your first instinct should be that there is something wrong.
Note: The scale of an object is entirely decided by your render scene, and thus BodyInstance->GetUnrealWorldTransform() always returns a scale of 1.
Your BodyInstance is NOT your component
Your component can have many body-instances, it is important to know which one you are working with! Also, if you have an actor with multiple primitive components which are welded together, then you will by default get the root body instance when calling GetBodyInstance() on your primitive component. Keep this in mind when calculating the world location of your various physics models.
Skeletal meshes are a pain in the a**
This is mostly a rant/word of warning: When working with skeletal meshes, you really need to keep in mind that the transform of say the root bone body instance is NOT the same as the transform of the actual skeletal mesh component.
Since we’ve had such a large amount if issues surrounding this at the office, we’ve created a set of helper functions that we use to resolve the world location of our substepped components.
class FPhysicsUtilities
{
	static void GetBoneTransformRecursive(FTransform& Transform, const USkeletalMeshComponent* SkeletalMeshComponent, const FName& Bone)
	{
		Transform *= FTransform(SkeletalMeshComponent->SkeletalMesh->GetRefPoseMatrix(SkeletalMeshComponent->GetBoneIndex(Bone)));
		const FName ParentBone = SkeletalMeshComponent->GetParentBone(Bone);
		if (ParentBone != NAME_None) {
			GetBoneTransformRecursive(Transform, SkeletalMeshComponent, ParentBone);
		}
	}

	static FTransform GetBoneRefTransformInComponentSpace(const USkeletalMeshComponent* SkeletalMeshComponent, const FName& Bone)
	{
		FTransform OutTransform = FTransform::Identity;
		GetBoneTransformRecursive(OutTransform, SkeletalMeshComponent, Bone);
		return OutTransform;
	}

    FTransform GetSubstepComponentWorldTransform(const USceneComponent* SceneComponent, FBodyInstance* ParentBodyInstance)
    {
    	const auto ParentBodyInstanceTransform = [&]()
    	{
    		if (SceneComponent->GetAttachSocketName() == NAME_None)
    		{
    			// If we are attached to a skel mesh, and the socket is None, we are attached to the skel mesh component, and not one of its bones.
    			// If this is the case, then we need to adjust for the fact that bodyInstance->GetUnrealWorldTransform() is going to give us the transform
    			// of the root bone, and NOT the transform of the skeletal mesh component.
    			//
    			// This can be done by getting the reference transform of the root bone in component space, and then "un-rotate" the relative component transform with this ref transform.
    			if (USkeletalMeshComponent * SkelMeshComponent = Cast<USkeletalMeshComponent>(ParentBodyInstance->OwnerComponent.Get()))
    			{
    				const auto RootBoneName = SkelMeshComponent->GetBoneName(0);
    				const auto BodyInstanceRefPosition = FPhysicsUtilities::GetBoneRefTransformInComponentSpace(SkelMeshComponent, RootBoneName);
    				return BodyInstanceRefPosition.Inverse() * ParentBodyInstance->GetUnrealWorldTransform();
    			}
    		}


    		return ParentBodyInstance->GetUnrealWorldTransform();
    	}();

    	// We might not be directly attached to the body instance, in this case walk the component chain until we find it
      	struct RetV { FTransform Transform; bool bAttachedToBodyInstance; };
      	const auto RelativeToParentInstanceTransform = [&]()->RetV
      	{
      		auto relativeTransform = SceneComponent->GetRelativeTransform();
      		auto sceneComp = SceneComponent;
      		while (sceneComp->GetAttachParent() != nullptr && sceneComp->GetAttachParent() != ParentBodyInstance->OwnerComponent)
      		{
      			sceneComp = sceneComp->GetAttachParent();
      			relativeTransform *= sceneComp->GetRelativeTransform();
      			if (sceneComp->GetAttachParent() == nullptr)
      				return { relativeTransform, false };
      		}

      		return { relativeTransform, true };
      	}();

      	 auto RelativeTransform = RelativeToParentInstanceTransform.bAttachedToBodyInstance
      		 ? RelativeToParentInstanceTransform.Transform * ParentBodyInstanceTransform
      		 : RelativeToParentInstanceTransform.Transform;

      	 // Take into account Absolute transforms
      	 if (SceneComponent->bAbsoluteLocation)
      		 RelativeTransform.SetLocation(SceneComponent->GetComponentLocation());
      	 if (SceneComponent->bAbsoluteRotation)
      		 RelativeTransform.SetRotation(SceneComponent->GetComponentQuat());
      	 if (SceneComponent->bAbsoluteScale)
      		 RelativeTransform.SetScale3D(SceneComponent->GetComponentScale());

      	 return RelativeTransform;
      }
  };
In our arrow example, the code would now look like this:
const auto WingWorldTransform = FPhysicsUtilities::GetSubstepComponentWorldTransform(this, BodyInstance);This will now work with any type of component, we can even attach the component to individual bones on a skeletal mesh if you, for example, wanted to add a rocket to the feet of your physics-simulated character.
You can use substepping without AddCustomPhysics
You can use the OnPhysSceneStep event of the physics to utilize substepping anywhere in your project. This also avoids the expensive substepping signups in tick.
if (FPhysScene* PhysScene = GetWorld()->GetPhysicsScene())
  PhysScene->OnPhysSceneStep.AddUObject(this, &UMyObject::SubstepPhysics);