Plugin feature overview
Not what you’re looking for? You can find the tutorial here.
Based on boat physics algorithm from Just Cause 3
The core water physics implementation of this plugin is based on the boat physics algorithm used in Just Cause 3. Originally written by Jacques Kerner, you can find the full implementation guide in his excellent writeup on gamasutra here. This algorithm has been tweaked in various ways to make it more generic, and to improve integration into Unreal Engine. If you would rather create your own implementation than buying some random internet guy’s version, then I’d strongly encourage you to do so!
However, before you start, a few words of warning: Jacques writeup was excellent and a lot of fun to implement. However, it was somewhat difficult to translate into code as he expressed the algorithm in more mathematical terms. It also didn’t help that most of the implementations of this algorithm you will find out there have huge mathematical errors in them, leading to a massive implementation headache as you can’t rely on other people’s work to check your results against. It took me a couple of months of researching, iteration, and a lot of help from a very maths proficient friend, before I arrived at a satisfactory implementation. If you decide to tackle this yourself and you want implementation advice, feel free to contact me at mans.martin.isaksson@gmail.com, I’ll be glad to help!
Unreal Engine Integration
For this plugin to provide sufficient value you want it to be well integrated with the host engine. From experience I have found that how you handle the setup of the hull used for your water-physics can make or break the user experience. It is not feasible to have to set up custom water simulation collision for each and every object in your game. It was with this experience I decided that the water physics for this plugin would work by automatically sourcing the collision from the simulated actor.
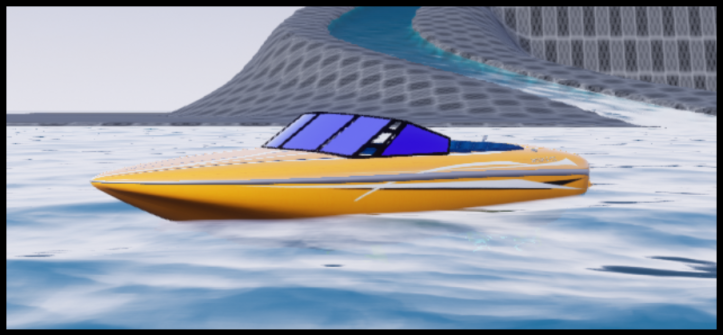
As illustrated in this picture, all the colliders set up as part of your standard unreal assets will automatically get detected by the water-physics system, making all simulated actors work with the water-physics out of the box.
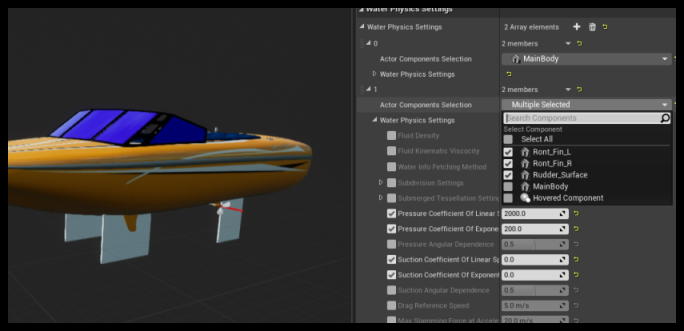
To be able to control the simulation behaviour on an individual component basis a custom UI has been created where individual water physics settings can be changed for each component on an actor. I am continuously looking for ways to improve the UI elements of this plugin so if you have any suggestions for improvements, feel free to contact me, I’d love to hear your from you!
With the release of 4.26 Epic introduced their “Water as an engine feature” concept. The engine now comes bundled with an incredibly powerful system for creating water visuals. This plugin leverages this to the fullest by shipping with an optional module which will allow you to easily add water physics to any Unreal Engine water surface.
It is important to note that Epic ship with a basic water physics implementation themselves, however it is based on a completely different set of principles and is not exactly comparable to what this plugin provides. If you are unsure about which solution is right for you then feel free to contact and I’ll do my best to give you a fair description on how they differ.
Customizable
The water physics portion of this plugin was built to be flexible, and extendable. There is no reason as to why you couldn’t integrate the water physics portion of this plugin with your very own water surface implementation, e.g. if you have your own way of generating an ocean, or other water surfaces, and want to use this plugin with those surfaces.
The code required to create this implementation is, at the moment, not all that well documented. I would advice you to take a look at the UEWaterIntegration module, which ships with the plugin, to see how it integrates Unreal Engine’s Water system.
Technical Details
This chapter aims to explain some of the more technical aspects of this plugin. This chapter might be worth reading if you are considering purchasing this product and want to know more details about its implementation to determine whether it is suitable for your project. It can also serve as a good guide for understanding the behaviour of your objects within the water physics simulation.
Collision Triangulation
Collision sourcing
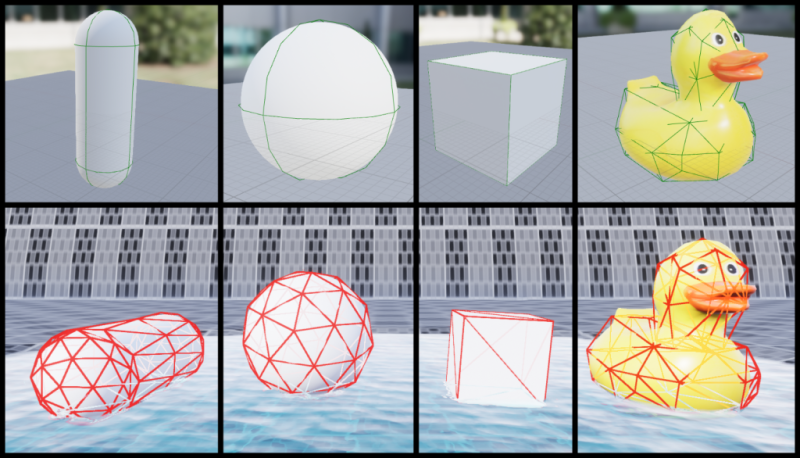
This plugin works by first converting all collision elements on your simulated body into triangles and then runs the necessary calculations on each triangle it deems to be submerged. The way it converts your mesh into triangles differs between all the collision primitives. The box and convex colliders can be quite trivially triangulated.
The convex mesh comes out as a triangle list straight out of unreal, meaning we have to do minimal transformation of its vertices to end up with the final triangulated mesh we use for the simulation.
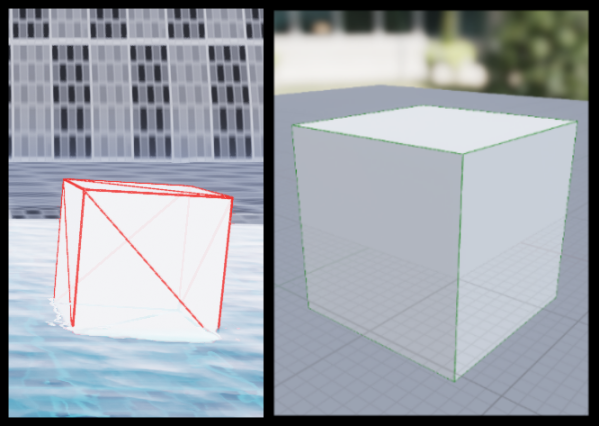
The box is simply split into 6 square sides, where each side is subsequently split into two triangles, for a total set of 12 triangles. The sphere and capsule are a bit more complicated to split as they cannot be perfectly represented as triangles.
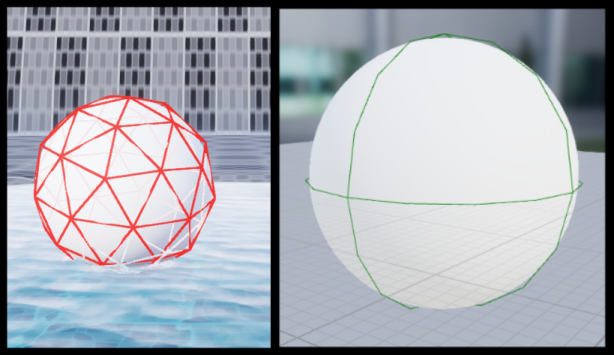
There sphere is triangulated in an ico-sphere configuration, maximizing the surface area of each triangle to reduce the overall number of triangles.
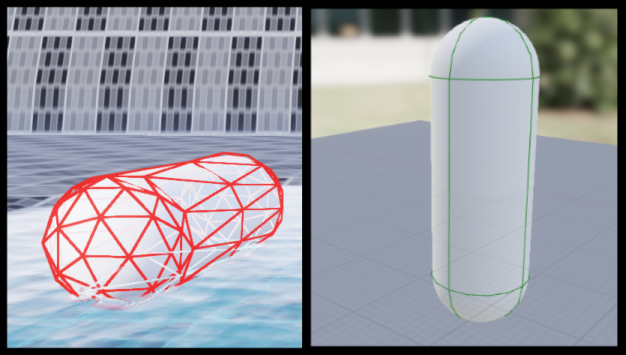
The capsule is triangulated in a very similar fashion to the ico-sphere, where we first create two independent halves of an ico-sphere and stitch them together to form a capsule.
You might think triangulating primitives such as spheres and capsules would result in inaccurate simulations. While this certainly the case for larger primitives, for most normal cases this method of triangulation will result in a very accurate final simulation result. If you need more precision for your particular simulation, you can increase the resolution of the triangulation by taking advantage of the tessellation functionality provided by this plugin. You can read more about this feature in the Triangle Subdivision section of this documentation.
Triangle splitting
As described in the Collision Sourcing section, this algorithm creates a set of submerged triangles and calculates the water physics forces for each of these triangles. Just checking each triangle on the triangulated collision to see if it is under water is not nearly accurate enough when creating a set of submerged triangles. The size of the triangles can vary widely, creating large sections which are not submerged being included in our calculations. To solve this, triangles are split along the water surface into one, or two, smaller triangles. The algorithm used to perform this splitting is in all practical terms identical to the algorithm described by Jacques Kerner. If you would like have more implementation details regarding this algorithm, I would advise reading Jacques’ excellent implementation description here.
Water Surface Provider
The triangle splitting algorithm requires some way of fetching the water surface location for all the vertices in our submerged triangle list. This can be a surprisingly expensive operation and some effort has been put towards improving the efficiency by allowing the user to set the method for fetching the water surface manually via the WaterPhysicsSettings. There are, at the moment, three alternatives for fetching the water surface: PerVertex, PerObject, and WaterSurfaceProvider.
The PerVertex option is very straight forward, it calls the GetWaterSurface function for each vertex on the submerged triangles. This leads to a very accurate water surface intersection result, however if calling GetWaterSurface is expensive (which it is in Unreals Water implementation) then this can become a rather large bottleneck for objects with more complicated collision setups.
The PerObject option is by far the most efficient, forcing the water surface splitting to only fetch the water surface height once per object. This option is perfect for a water surface which doesn’t have any large waves, or if the objects are small enough to not create large differences in the water surface height along the object.
The WaterSurfaceProvider is a form of middle ground, allowing the user to define the water surface fetching themselves through C++. The WaterSurfaceProvider can be set on the WaterPhysicsSceneComponent by either calling SetWaterSurfaceProvider, or overriding the MakeWaterSurfaceProvider function in a child class.
By default, the WaterSurfaceProvider used by the WaterPhysicsSceneComponent is the WorldAlignedWaterSurfaceProvider. This provider implements an optimized strategy for fetching the water surface where the surface is sampled a few times around the object and the final water surface location will be interpolated in between these points. This can reduce the number of calls made to GetWaterSurface drastically, especially when you have a lot of vertices packed close together. It does however come with some limitations, mainly reducing the resolution of potential waves on your water surface. However, in most cases this won’t affect the final simulation much. You can inspect the behaviour of the WaterSurfaceProvider by enabling the bDrawWaterInfoDebug option on the WaterPhysicsSceneComponent.
Triangle Subdivision
When triangulating certain collision primitives you may end up with rather large triangles in proportion to the size of your collider. For example, triangulating a box will produce two large triangles per face, meaning if you have non uniform cube, you might end up with a few rather large triangles and some not-so-big ones.
This can end up affecting the accuracy of your water physics simulations, as the larger the triangles are, the more approximate the final forces for that triangle will be. In a perfect simulation you would calculate the force for each infinitely small point on the collider, and then add up all the forces to get the final force for your body. Since we don’t live in a perfect world, we have to do the second-best thing, which is to approximate the points using a set of flat surfaces along our body. In this case, our triangles.
This means that the more triangles you have, the more accurate the final force will become. If you are seeing strange behaviour, or the forces aren’t looking as realistic as you’d like, you can try tweaking the subdivision/tessellation settings four your physics bodies.
There are two settings you can tweak here: SubdivisionSettings, and SubmergedTessellationSettings. The first is fairly straight forward; it will take the triangles produced by the collision triangulation step and subdivide them the specified number of levels. This can greatly improve the accuracy of your simulation as we can at this step take the shape of the collider into account, making for example sphere collider subdivision maintain the round shape of the sphere. However, it can have some pretty major drawbacks. You will end up doubling the number of triangles each iteration of your subdivision. This greatly increases the number of triangles which needs to be split against the water surface. This will increase the accuracy of the submersion, and subsequently the interaction with waves, however it can come at a huge performance cost. This method of subdivision will split your triangles indiscriminately, with no regard for triangle size, meaning you might end up with tons of really small triangles and a few large ones. To solve these issues there is a second method you can use to increase the accuracy of your simulation with a lower performance cost.
The SubmergedTessellationSettings allows you to specify how to split already submerged triangles. This has a huge performance benefit as we’re splitting a sub-set of all the triangles on our physics body. We also no longer need to intersect these new triangles against our water surface as we’re only subdividing already submerged triangles. There is also the option here to target a certain size of triangle instead of subdividing indiscriminately. This produces a much more even spread of triangle sizes, which gets rid of the problem of accidentally splitting really small triangles and ending up with a huge set of really small triangles.
Water Physics Scene
The WaterPhysicsScene is the core of this plugin. Think of it as you would any other physics scene in a physics engine: a collection of primitives and settings for how they should behave. This scene uses the PrimitiveComponent and a name to a BodyInstance on said component to keep track of which physics bodies should have water physics applied to them. The pointers to the PrimitiveComponents are garbage collected and will automatically get purged if the components are destroyed by an external party.
You can add and remove bodies to this scene at will, specifying what water physics settings should be used for each physics body. The entire scene can then be stepped at once calling StepBodyWaterPhysics. It is safe to step this scene during unreal engine sub-stepping for improved simulation stability.
The WaterPhysicsScene is intentionally kept very simple and does not have features such as automatic updating of water physics settings, or automatic adding of physics bodies which might get added to a component at runtime. This is instead up to each implementation of the water physics scene to manage on their own. You can take a look at WaterPhysics_WaterVolume, or WaterPhysics_WaterBody to see how the WaterPhysicsSceneComponent is used to implement the behaviours described above.
To wrap this C++ only struct there exists the WaterPhysicsSceneComponent which wraps the WaterPhysicsScene and exposes a more friendly interface for managing the water physics scene. This component is especially useful if you wish to create your own custom water bodies and want to manage how the physics bodies gets added, removed, and updated within the scene yourself. Parts of this interface is also exposed to blueprint, however functionality such as the WaterSurfaceGetter and the WaterSurfaceProvider are for the time being limited to C++ due to the enormous performance overhead introduced by running these in blueprint. The WaterPhysicsSceneComponent also helps you manage the ticking of the water physics scene by automatically subscribing to the ticking of your physics scene. This component will automatically utilize substepping if enabled by your project.
Water Physics Settings
Water Physics Settings Structure
Simulating water physics requires a lot of tweakable parameter. To consolidate all of these parameters in a manageable format the WaterPhysicsSettings was created. This structure is inspired by Epic’s PostProcessSettings structure which allows the user to override individual members on the structure without affecting the rest of the settings. The water physics scene works by having some default water physics settings and allowing each water physics body to individually override settings without affecting the base setting of non-overridden members.
Water Physics Settings Component
Although this functionality of being able to override water physics settings on a per-body basis is powerful, it can be a pain to manage all the settings by having to keep track of which settings should be applied to which body. To make the act of setting custom water physics settings for the desired physics bodies simpler the WaterPhysicsSettingsComponent was added as a way of easily managing the water physics settings for the individual components on an actor.
This component exposes a custom user interface which allows the user to select a set of components in blueprint, and then specifying the individual settings which should be overridden for the selected components. This component also exposes the function NotifyWaterPhysicsSettingsChanged which notifies any listener that the settings attached to this component has been changed. This automatically updates the settings in the water physics scene for the relevant physics bodies if you’re using the built in water physics scene solutions.
It is up to each implementation of the water physics scene to manage the integration of the WaterPhysicsSettingsComponent. However, if you use the WaterPhysicsActor to implement your custom water physics scene behaviour then you should not need to do any extra work to utilize the benefits of the WaterPhysicsSettingsComponent.
What the different parameters do
If you want an exact overview of what each parameter does, you can read through the paper which this plugin was based on here. He goes through all the parameters in honestly a bit too much detail (it’s a bit hard to understand at times). However, if here’s a quick summary that should give you a general idea of how to get the simulation to match your needs.
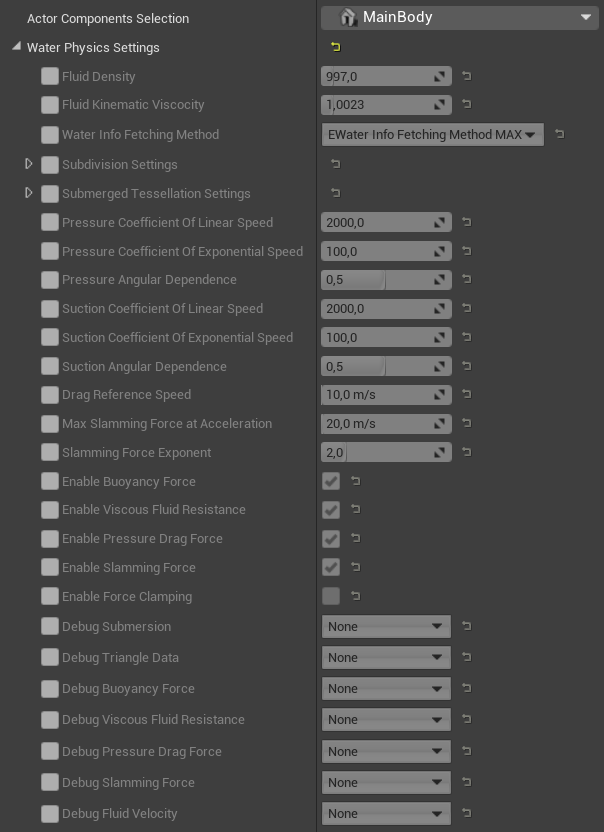
Fluid Density: Controls the “density” of the fluid for the main buoyancy simulation. This is the main parameter you would want to tweak to increase/decrease the strength of the buoyancy (lower = less strong buoyancy)
Fluid Kinematic Viscosity: Controls how much “horizontal drag” the object will experience when sliding along the water surface. Think syrup vs water, sliding something on-top of syrup is going to make it slow down much faster. So the rule of thumb for this one is: higher value = object slows down faster.
Water Info Fetching Method: A bit of an advanced feature that I’d recommend you ignore unless you’re trying to improve performance or create your own water surface. In short it tells the water physics system how to poll the water surface for wave locations.
Subdivision Settings: In short, since this plugin works by generating a triangle mesh for the object and then calculates the water physics locally for each triangle, you can run into issues where the generated triangles are too large on some objects. This setting allows you to increase the density of the generated triangle mesh. A word of warning, incresing the number of triangles can have negative effects on performance.
Submerged Tessellation Settings: Very simular to Subdivision Settings with one major difference, the triangle division happens after the triangle mesh has been splitted along the water surface. The benefit of doing it at this stage is that we reduce the performance penalty of splitting a very high-resolution mesh. At this stage we can also optimize the splitting to try and make the triangles as closly sized as possible. This can help improve the stability of the water physics simulation a fair bit.
Pressure/Suction Coefficients: These might be the most confusing of them all. But just like how syrup will make it harder to slide along the surface, it would also make it harder to push the object into the liquid, and harder to pull it out. In general you shouldn’t have to change these too much, but if you for example want a part of your object to push hard against the water, or resist being pulled out, you can tweak those values.
Drag Reference Speed: The pressure/drag system works using this reference speed. E.g. if the object is moving at exactly this speed then the drag is at 100%. If it is moving at four times that speed then it would be 400% for the linear part and 400%^2 for the exponential part. In general I’m not a big fan of how these values have been exposed. They were mainly based on the main paper, however even I find it a bit fiddly to change the drag values at times.
Max Slamming Force At Acceleration: The slamming force is a special kind of force which helps reduce “bounciness” when an object hits the water at high speed. It does this by pushing back proportionally to how hard the object is accelerating into the water. E.g. if the object is “slamming” into the water at 20 m/s then it will apply 100% slamming force.
Slamming Force Exponent: The slamming force will grow exponentially. E.g. hitting the surface at 20 m/s will give you 100% slamming force, hitting it at 40 m/s will give you 200%^Slamming Force Exponent.
Enable <ForceName> Force: These are simple toggles to enable/disable all the various forces.
Enable Force Clamping: Sometimes when working with light objects the forces can cause the object to bounce around. This can help reduce that effect, however it cannot clamp the forces perfectly so I’d advise leaving it off unless you really need to enable it.
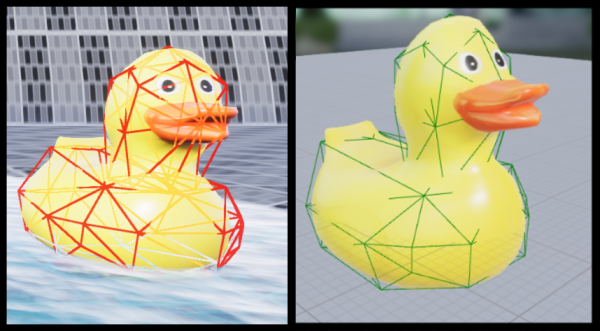
Debug Submersion: This plugin works by creating a triangle mesh around your object and then cutting this mesh along the water surface. By enabling this the water physics system will debug-draw the mesh which has been cut-out to be underneath the water surface. By enabling verbose it will also draw the normals of the triangles. Useful if you create your own water physics collision mesh to verify that the normals are pointing in the correct direction.
Debug Triangle Data: Same as Debug Submersion but will draw the entire triangle mesh generated for this object.
Debug Forces: Since all the forces are calculated in their own passes I have added the ability to visualize how the forces act around the object using these settings. Selecting “Normal” will draw one final force vector at the center of submersion, selecting “Verbose” will draw all the small forces calculated throughout the object which are later added together to produce the final force.